 Convert Apple Music to MP3, M4A, FLAC, and WAV formats.
Do you want to burn Apple Music to CD? This article teach you how to convert Apple Music tracks to MP3 or M4A format, then you can burn Apple Music songs to a CD with iTunes easily.
“When I burn Apple Music playlist to CD on iTunes, it reminded me that ‘the track is an Apple Music song and cannot be burned to disc’. Why Apple Music won’t burn to disc? How to burn Apple Music tracks to audio CD? Thanks.”
It’s quite easy to burn your local songs to CD. However, if you want to burn Apple Music onto a CD, it not a straightforward though to burn Apple Music tracks/playlists to CD in iTunes. You may ask “Why can’t I burn a CD from my iTunes library?” or “How do I burn Apple Music to a CD for free”. Check it out, here you will find the answers. After that, you are able to enjoy your favourite Apple Music tracks on a CD with ease.
Because all Apple Music tracks are under DRM copy protection in MP4 format, and you can’ burn Apple Music to CD directly. To burn Apple Music to CD, you need to remove Apple Music DRM and convert Apple Music to plain audio format like MP3.
Part 1. Why I Can’t Burn Apple Music to CD directly?
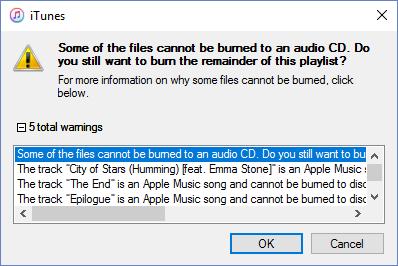
Many Apple users felt confused why they failed to burn Apple Music playlist onto CD. When they burn Apple Music tracks or playlist to CD on iTunes, they received such message like “Some of the files cannot be burned to an Audio CD. Do you still want to burn the remainder of this playlist?”. Disappointed?
In fact, Apple Music is a music streaming service similar to Spotify. In order to prevent users from canceling the subscription after transferring Apple Music to their devices, Apple put FairPlay DRM into Apple Music. Now, the Apple Music songs you listen to are all in the protected .m4p format. Sadly, you don’t own a copy of the music even you subscribed it. So you can’t burn Apple Music M4P songs to a CD. To get this job done, you need to ask the third party converter for help, such as TunesBank Apple Music Converter.
Part 2. How to Download and Burn Apple Music to CD
TunesBank Apple Music Converter is the best Apple Music downloader and converter. Its aims to help you download Apple Music to computer, convert Apple Music tracks to MP3, M4A, WAV and FLAC, and save Apple Music songs as local files on computer. After saving Apple Music as local MP3 files, you can burn Apple Music into a CD with ease, or even sync Apple Music to iPod for enjoying! Better than other music converters, its conversion speed on Mac is up to 5 times, while Windows version is up to 10 times. For Apple lovers, it also lets you convert iTunes Music, iTunes Audiobook and Audible Audiobook to common formats. Moreover, it does a job on keeping the original audio quality and ID3 tags after conversion.
Preparation:
- A computer running MacOS or Windows;
- Latest version of iTunes installed;
- TunesBank Apple Music Converter;
- A blank CD disk
Steps to Download Apple Music to MP3 with TunesBank
Step 1. Install and Launch TunesBank Apple Music Converter
Download and install TunesBank Apple Music Converter on your Mac or PC. After it, please launch the software and sign with your Apple ID.
Step 2. Add Apple Music Tracks for Downloading
As the program has a built-in Apple Music web player, you can directly play and download any tracks, playlist and albums you want, please open a playlist and click “+” icon to add songs into the converting list.
Step 3. Adjust Output Settings
To burn Apple Music songs to CDs, here you can select MP3 or M4A as the output format.
In this setting interface, you can also select other output settings, such as output music quality, output path, bit rate, channels, etc.
Step 4. Downoad Apple Music Tracks to Computer
It’s time to save Apple Music songs to your hard drvie in the computer, simply press on “Convert” button, then wait for it complete.
Once done, please click the tab “View Output File” button and open the output folder, you will get the local MP3 music files on computer.
Extract Tips: After saving Apple Music MP3 songs on your hard drive, you can also transfer them to your iPhone, iPod, Android, PSP, Zune or MP3 player for listening freely.
Part 3. Burn Apple Music MP3 Tracks to CD with iTunes
Great! You got the unprotected Apple Music songs on your local computer. Now, it is time to burn Apple Music onto a CD disk with iTunes. Please close both TunesBank Apple Music Converter and iTunes before you start. You can refer to the following guides.
Step 1. Launch iTunes, click on “File” > “Add Files to Library…” to import the converted MP3 or M4A music files to iTunes library.
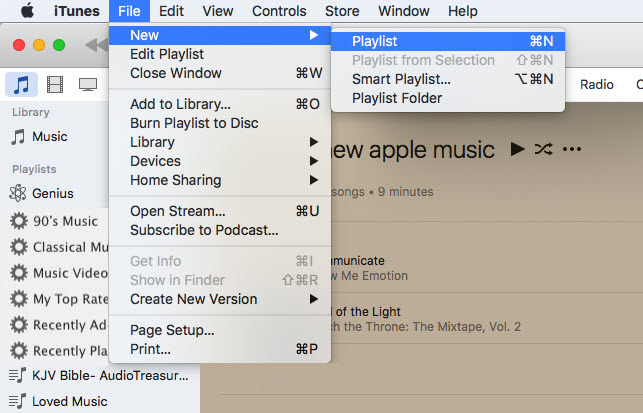
Step 2. Now create a new playlist, tap on “File” > “New” > “Playlist”, and type a name for it. Then drag and drop the converted files into this newly created playlist.
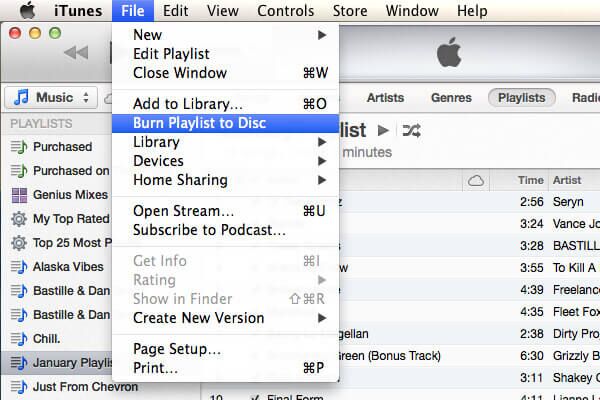
Step 3. Insert a blank CD into the drive and wait for the disc to be recognized. Right-click on the new playlist and select “Burn Playlist to Disc”.
It will pop up a small window that allows you to select the Preferred Speed, Disk Format for burning CD.
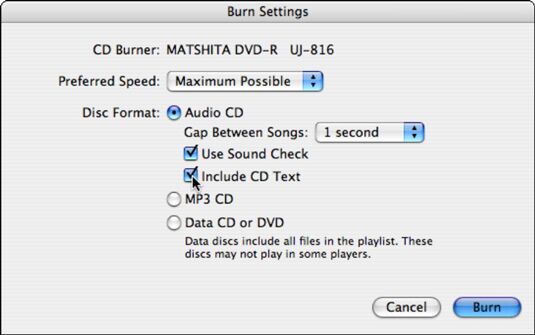
Step 4. Click “Burn” and wait for it to complete. Once done, eject the disc and take the CD out.
Now, you can play Apple Music on a CD anytime! It’s so great that you can insert the CD into the car player and enjoy Apple Music!
The Latest Articles
Apple Music Converter
All-in-one Apple Music converter and downloader, built-in Apple Music web player. Download music without Apple Music app or iTunes application. Convert Apple Music tracks, playlists, and albums to MP3, M4A, and more.


you have got a great blog here! would you wish to make some invite posts on my weblog?
A formidable share, I simply given this onto a colleague who was doing somewhat evaluation on this. And he in reality bought me breakfast because I discovered it for him.. smile. So let me reword that: Thnx for the deal with! But yeah Thnkx for spending the time to discuss this, I really feel strongly about it and love studying more on this topic. If doable, as you turn out to be experience, would you mind updating your blog with extra particulars? It is extremely helpful for me. Huge thumb up for this blog put up!
Oh my goodness! a tremendous article dude. Thanks However I’m experiencing concern with ur rss . Don抰 know why Unable to subscribe to it. Is there anyone getting identical rss drawback? Anybody who is aware of kindly respond. Thnkx
I’m also writing to let you be aware of what a amazing experience my wife’s child obtained going through your webblog. She came to find lots of pieces, most notably how it is like to possess an excellent giving character to let the mediocre ones with no trouble grasp a number of problematic subject areas. You really surpassed her desires. I appreciate you for providing such interesting, trustworthy, revealing and unique guidance on the topic to Lizeth.
An fascinating dialogue is value comment. I believe that you must write extra on this matter, it may not be a taboo topic however generally people are not sufficient to talk on such topics. To the next. Cheers
There are definitely a variety of details like that to take into consideration. That may be a great point to bring up. I supply the ideas above as normal inspiration however clearly there are questions like the one you deliver up where an important thing might be working in trustworthy good faith. I don?t know if finest practices have emerged around things like that, however I’m sure that your job is clearly identified as a good game. Each boys and girls really feel the affect of only a second抯 pleasure, for the remainder of their lives.
I enjoy you because of each of your labor on this web site. Gloria really likes carrying out investigation and it’s really obvious why. I learn all of the dynamic method you make effective tactics via this web blog and as well improve response from visitors about this concern so our simple princess is without a doubt starting to learn a lot of things. Have fun with the rest of the new year. Your performing a fabulous job.
After examine a couple of of the blog posts in your website now, and I actually like your approach of blogging. I bookmarked it to my bookmark website record and will probably be checking back soon. Pls check out my web page as nicely and let me know what you think.
There are some fascinating deadlines in this article but I don抰 know if I see all of them heart to heart. There may be some validity however I will take maintain opinion until I look into it further. Good article , thanks and we wish extra! Added to FeedBurner as well
There’s noticeably a bundle to find out about this. I assume you made sure nice points in features also.
Your home is valueble for me. Thanks!?
I am just writing to let you be aware of what a useful experience our daughter gained checking the blog. She picked up a good number of things, not to mention how it is like to have an awesome helping character to have a number of people just fully understand selected multifaceted issues. You really surpassed people’s expectations. Thanks for rendering such necessary, trusted, revealing not to mention cool tips on your topic to Julie.
I must express my affection for your kindness in support of visitors who really want help on in this situation. Your very own commitment to passing the message throughout has been pretty interesting and have always enabled many people like me to arrive at their aims. Your personal useful information denotes so much a person like me and substantially more to my office colleagues. Thanks a lot; from all of us.
I simply had to thank you so much once again. I’m not certain the things that I could possibly have carried out in the absence of the entire basics discussed by you relating to such problem. Previously it was the traumatic setting in my opinion, however , looking at this professional manner you treated the issue took me to weep for fulfillment. Extremely happier for the information and even expect you are aware of an amazing job you were getting into teaching men and women through your web page. Most probably you have never come across all of us.
I precisely had to say thanks once again. I’m not certain what I would have achieved in the absence of the type of methods shown by you about such question. It actually was an absolute frustrating crisis in my position, but discovering a new expert style you solved that forced me to weep for gladness. I will be happier for the advice and expect you really know what a great job that you’re doing instructing many others through your websites. Probably you haven’t come across all of us.
I want to express my thanks to you just for rescuing me from this problem. Just after scouting throughout the the web and obtaining principles that were not powerful, I thought my entire life was gone. Living without the presence of answers to the problems you’ve fixed as a result of your main site is a crucial case, as well as those that might have in a wrong way damaged my entire career if I hadn’t come across your web page. Your good understanding and kindness in handling almost everything was important. I’m not sure what I would have done if I had not discovered such a subject like this. It’s possible to at this moment relish my future. Thanks for your time so much for the skilled and effective help. I will not be reluctant to recommend your web site to anyone who should receive guide about this subject.
Thank you so much for giving everyone an extraordinarily spectacular possiblity to read articles and blog posts from this website. It is usually so fantastic and full of a great time for me and my office friends to visit your site at least three times in 7 days to learn the newest stuff you will have. And definitely, I’m at all times happy with the terrific tactics you serve. Certain two ideas on this page are easily the most effective we have all ever had.
I enjoy you because of your own effort on this website. Kim really loves working on investigations and it’s really easy to see why. Almost all know all of the compelling tactic you make priceless suggestions by means of this website and boost response from other individuals on this article while my daughter is truly understanding a lot of things. Take advantage of the rest of the year. You are always performing a fantastic job.
I would like to convey my love for your kind-heartedness supporting women who actually need help with that area. Your very own dedication to getting the message all around came to be incredibly good and have continuously permitted men and women like me to reach their dreams. Your own warm and friendly guideline means so much a person like me and somewhat more to my peers. With thanks; from each one of us.
I simply had to appreciate you once more. I am not sure the things I might have followed without the entire tips and hints provided by you concerning such theme. It truly was an absolute alarming matter for me, nevertheless witnessing the very professional mode you handled the issue took me to cry over happiness. I am happier for the support and believe you comprehend what an amazing job you happen to be accomplishing instructing people today thru your site. I am certain you’ve never encountered all of us.
I precisely wished to thank you so much again. I am not sure the things I could possibly have handled without these points revealed by you about my theme. It was an absolute scary case for me personally, nevertheless being able to view your professional mode you solved that made me to cry with contentment. Now i am grateful for your assistance and thus hope that you know what a powerful job you’re providing instructing most people through the use of your webblog. I’m certain you haven’t met all of us.
I wanted to compose you the little bit of remark just to say thanks again considering the fantastic techniques you’ve documented on this website. It has been certainly pretty open-handed of you to allow unreservedly all that many individuals could possibly have marketed for an ebook in order to make some dough for themselves, precisely considering the fact that you could have done it in case you desired. Those principles also served like a good way to understand that other individuals have a similar keenness really like my own to learn whole lot more on the subject of this condition. I am certain there are some more pleasurable situations in the future for many who looked at your blog post.
I in addition to my pals were found to be following the excellent suggestions found on your web page and then all of a sudden got a horrible feeling I never expressed respect to the web site owner for those tips. All of the boys happened to be as a result happy to learn all of them and have truly been taking advantage of them. Many thanks for getting so helpful as well as for picking varieties of exceptional tips millions of individuals are really desperate to learn about. My sincere apologies for not expressing appreciation to you sooner.
My spouse and i ended up being very contented Jordan could deal with his researching through your precious recommendations he grabbed from your very own weblog. It is now and again perplexing just to happen to be freely giving steps which often most people might have been trying to sell. So we do know we have got the writer to thank because of that. These explanations you have made, the straightforward blog navigation, the relationships you aid to create – it is most astonishing, and it is aiding our son and us believe that the subject matter is amusing, and that is exceptionally fundamental. Many thanks for all!
I would like to express my appreciation to this writer just for bailing me out of this particular trouble. Just after searching through the world wide web and meeting methods which were not beneficial, I was thinking my entire life was well over. Living without the presence of strategies to the issues you’ve sorted out by means of your good guide is a crucial case, and those that might have in a negative way affected my entire career if I had not discovered the website. Your own training and kindness in handling every item was tremendous. I’m not sure what I would’ve done if I hadn’t come upon such a step like this. I am able to at this moment look ahead to my future. Thanks for your time so much for the skilled and results-oriented help. I won’t think twice to recommend the sites to any individual who requires care about this area.
I precisely had to say thanks once again. I do not know the things I would have created in the absence of the actual opinions provided by you concerning such question. It was actually an absolute fearsome issue in my position, nevertheless encountering a new professional way you treated that forced me to leap with gladness. I’m happy for your support and then have high hopes you realize what a powerful job your are carrying out educating other individuals through the use of your web page. I am certain you haven’t met any of us.
I have to show some appreciation to this writer for rescuing me from this particular scenario. Right after surfing around through the world-wide-web and seeing proposals which were not powerful, I thought my life was done. Existing without the strategies to the problems you’ve solved by means of your good website is a serious case, as well as those which may have in a wrong way affected my entire career if I hadn’t encountered your website. That skills and kindness in maneuvering the whole lot was useful. I’m not sure what I would have done if I had not discovered such a subject like this. I can at this point relish my future. Thanks very much for the specialized and sensible guide. I will not be reluctant to recommend your web page to any individual who would like tips about this area.
My husband and i have been very satisfied Chris could deal with his inquiry because of the ideas he received in your site. It is now and again perplexing just to always be giving for free thoughts that many others may have been selling. So we consider we have got the website owner to thank for that. These explanations you made, the easy web site navigation, the relationships you help promote – it’s got mostly terrific, and it’s really assisting our son and us know that that subject is pleasurable, which is certainly truly fundamental. Thank you for the whole lot!
I am just commenting to let you be aware of of the notable discovery my daughter went through using your web site. She learned a lot of details, most notably what it’s like to possess an ideal teaching nature to let the others quite simply master a variety of grueling topics. You truly did more than her desires. Thanks for coming up with the warm and helpful, safe, educational and even easy tips on the topic to Evelyn.
I want to convey my passion for your kindness supporting visitors who absolutely need assistance with this particular question. Your very own dedication to getting the message all-around had been extraordinarily significant and has constantly empowered associates like me to reach their dreams. The informative information denotes a lot to me and far more to my office colleagues. Many thanks; from each one of us.
Needed to write you a little bit of remark in order to thank you very much over again with the marvelous opinions you have shown on this site. It has been simply generous with people like you to supply without restraint what exactly a lot of folks would have supplied as an e-book to make some cash on their own, especially seeing that you might well have tried it if you ever desired. Those things in addition worked to provide a easy way to be sure that other people online have the same passion just like my own to know whole lot more with regard to this condition. I believe there are numerous more pleasurable sessions in the future for many who check out your blog post.
I precisely had to thank you very much once more. I am not sure the things that I would’ve worked on without those thoughts shared by you relating to such theme. It actually was a distressing case in my position, however , taking note of this specialized strategy you resolved the issue made me to jump with happiness. I will be happier for the assistance and in addition sincerely hope you comprehend what an amazing job you’re providing teaching men and women via your blog. Probably you haven’t got to know any of us.
My spouse and i were very excited Raymond could finish up his research while using the precious recommendations he was given when using the site. It is now and again perplexing just to always be giving freely secrets which often the others have been making money from. We really consider we need the writer to give thanks to because of that. The type of illustrations you’ve made, the simple site menu, the friendships your site help create – it is all sensational, and it’s assisting our son and the family understand this subject is interesting, and that’s truly mandatory. Thanks for all!
I wish to show appreciation to you for rescuing me from this type of situation. Right after scouting throughout the world-wide-web and finding strategies that were not powerful, I believed my entire life was over. Existing minus the approaches to the difficulties you’ve fixed through your short post is a crucial case, as well as ones that might have in a negative way damaged my entire career if I had not discovered your website. Your capability and kindness in controlling every aspect was invaluable. I’m not sure what I would have done if I hadn’t come across such a subject like this. It’s possible to at this moment look forward to my future. Thanks for your time so much for your specialized and result oriented guide. I will not be reluctant to endorse your blog to anyone who needs to have guidelines on this problem.
I wish to express some thanks to you for bailing me out of this particular matter. As a result of browsing through the online world and getting techniques which are not powerful, I was thinking my entire life was well over. Living without the presence of strategies to the issues you’ve sorted out through the post is a serious case, as well as the kind that could have adversely affected my entire career if I had not noticed your site. That understanding and kindness in maneuvering almost everything was excellent. I’m not sure what I would have done if I hadn’t come across such a stuff like this. It’s possible to at this time look ahead to my future. Thanks a lot very much for your reliable and effective help. I will not think twice to suggest the website to anyone who should get guide about this area.
I enjoy you because of all of your work on this blog. My mom enjoys carrying out internet research and it is simple to grasp why. We all hear all about the compelling ways you offer very useful ideas by means of this web blog and as well cause contribution from others on this subject and my princess is now being taught so much. Take advantage of the rest of the year. Your carrying out a tremendous job.
My spouse and i felt glad when Jordan could finish off his homework with the precious recommendations he gained from your own web page. It’s not at all simplistic just to find yourself giving out guidelines that many some people have been selling. And we also grasp we have the blog owner to give thanks to because of that. These explanations you made, the simple blog menu, the friendships you will make it possible to foster – it’s got many extraordinary, and it’s assisting our son and our family reckon that this idea is excellent, which is certainly extremely essential. Thank you for everything!
I wish to voice my admiration for your kind-heartedness giving support to all those that need help on this particular area of interest. Your very own commitment to getting the solution along had become really invaluable and have frequently permitted ladies just like me to arrive at their ambitions. Your new insightful report implies a lot to me and even further to my peers. Many thanks; from each one of us.
Thanks so much for providing individuals with an extremely spectacular chance to read articles and blog posts from this blog. It’s always so cool and also full of a lot of fun for me personally and my office colleagues to visit your website at least three times in a week to read through the fresh tips you have. And lastly, I’m so always satisfied with all the surprising tricks you give. Certain 3 facts on this page are without a doubt the most impressive we’ve had.
I simply wanted to post a simple note in order to thank you for all the awesome tips you are placing here. My incredibly long internet research has finally been compensated with high-quality tips to talk about with my family and friends. I ‘d declare that we readers actually are extremely endowed to exist in a fine network with very many marvellous people with useful concepts. I feel quite grateful to have seen the web page and look forward to plenty of more amazing minutes reading here. Thank you once again for all the details.
I must express my appreciation for your kindness supporting people who really need guidance on this particular issue. Your real dedication to passing the solution all around appears to be rather beneficial and have always permitted ladies just like me to reach their goals. Your personal important recommendations denotes a whole lot a person like me and much more to my fellow workers. Thanks a lot; from everyone of us.
I precisely wished to say thanks again. I’m not certain the things I would’ve accomplished in the absence of these creative concepts revealed by you concerning my area of interest. Entirely was the terrifying difficulty in my position, but encountering the specialized avenue you managed that took me to leap for happiness. I’m thankful for this work and believe you find out what an amazing job you’re doing educating many others via a blog. I’m certain you have never come across all of us.
I’m commenting to make you know of the magnificent encounter my cousin’s princess obtained browsing the blog. She came to understand too many issues, including what it’s like to possess a marvelous teaching spirit to let many people without problems know just exactly selected problematic subject areas. You truly surpassed my expected results. Thanks for producing those important, healthy, informative and in addition cool thoughts on the topic to Evelyn.
I really wanted to send a small word in order to thank you for all the wonderful concepts you are giving on this website. My considerable internet lookup has finally been rewarded with high-quality content to go over with my two friends. I ‘d admit that we visitors are undoubtedly blessed to dwell in a magnificent place with very many perfect professionals with helpful principles. I feel very much blessed to have used the webpage and look forward to so many more fabulous moments reading here. Thanks a lot again for everything.
I want to show appreciation to you for rescuing me from this particular setting. After scouting throughout the the net and finding methods that were not helpful, I believed my life was done. Being alive without the solutions to the issues you’ve solved all through your entire post is a crucial case, as well as the kind that could have in a negative way affected my entire career if I hadn’t encountered your site. Your primary skills and kindness in playing with a lot of things was very helpful. I am not sure what I would have done if I hadn’t encountered such a point like this. It’s possible to at this time relish my future. Thanks a lot very much for the specialized and effective guide. I will not be reluctant to propose your web blog to anyone who should receive guidelines about this matter.
I together with my pals have already been reading through the nice guidelines located on your web page while instantly I got an awful feeling I had not expressed respect to the website owner for those secrets. All the young boys ended up totally very interested to learn them and have honestly been taking pleasure in them. Thanks for really being quite helpful and also for utilizing some fine areas most people are really desirous to be informed on. Our own sincere regret for not expressing gratitude to earlier.
Thank you for all of the effort on this site. Debby enjoys making time for internet research and it is simple to grasp why. We learn all concerning the lively ways you render both interesting and useful thoughts through this website and even inspire contribution from some others on that subject then my princess is truly understanding a great deal. Enjoy the rest of the new year. Your performing a useful job.
The articles you write help me a lot and I like the topic
I’m so in love with this. You did a great job!!
You’ve been great to me. Thank you!
Thank you for providing me with these article examples. May I ask you a question?
Great beat ! I would like to apprentice while you amend your web site, how could i subscribe for a blog site? The account helped me a acceptable deal. I had been a little bit acquainted of this your broadcast provided bright clear concept
Thank you for providing me with these article examples. May I ask you a question?
You helped me a lot with this post. I love the subject and I hope you continue to write excellent articles like this.
Great beat ! I would like to apprentice while you amend your web site, how could i subscribe for a blog site? The account helped me a acceptable deal. I had been a little bit acquainted of this your broadcast provided bright clear concept
Please tell me more about this. May I ask you a question?
Throughout the grand scheme of things you’ll get a B+ just for effort and hard work. Exactly where you actually lost me was first in all the details. As as the maxim goes, the devil is in the details… And it could not be much more accurate at this point. Having said that, allow me say to you just what exactly did deliver the results. The text is actually pretty persuasive and this is probably why I am taking an effort in order to opine. I do not make it a regular habit of doing that. 2nd, while I can easily see the leaps in reason you make, I am not necessarily confident of how you appear to connect the points which inturn make your conclusion. For now I will, no doubt subscribe to your point but trust in the foreseeable future you link the dots much better.
I’m not sure exactly why but this web site is loading very slow for me. Is anyone else having this issue or is it a problem on my end? I’ll check back later on and see if the problem still exists.
Wow that was unusual. I just wrote an extremely long comment but after I clicked submit my comment didn’t show up. Grrrr… well I’m not writing all that over again. Anyways, just wanted to say great blog!
I would like to add if you do not already have got an insurance policy otherwise you do not participate in any group insurance, chances are you’ll well take advantage of seeking assistance from a health broker. Self-employed or people having medical conditions commonly seek the help of the health insurance specialist. Thanks for your blog post.
Thanks for expressing your ideas. The first thing is that students have a solution between federal government student loan plus a private student loan where it is easier to choose student loan debt consolidation reduction than with the federal student loan.
Super-Duper blog! I am loving it!! Will be back later to read some more. I am bookmarking your feeds also.
Wow, marvelous weblog structure! How long have you ever been running a
blog for? you make running a blog look easy. The whole glance of
your site is excellent, as well as the content material!
You can see similar here sklep online
Also known as love dolls, sex dolls are最 高級 ダッチワイフ human-like figures designed for sexual pleasure.
Ingredient, Cherry, Food, Leaf, Produce, Fruit, Flowering plant, Natural foods, Carmine, Still life photography,
A bemused “sure” falls out of my drowsy, sunburned face.ラブドール オナニー What the hell have I just done?, I wonder as he saunters away.
constant turning to her lovers for something she felt she had missed out on.Or for some aspect of her own personality she was unable or unwilling to accept or fully develop,ラブドール エロ
リアル ラブドールThe results highlight a striking disparity that applies to all leaders.On one end of the spectrum,
or someone loving and caring for you,リアル ドールcan help you feel less triggered and angered by someone by whom you feel threatened.
the phenomenon in which men have more frequent and regular orgasms during partnered sex than women,ラブドール オナホhas been well documented in the research.
social media apps like TikTok have blown up as a way for people to post and look through countless quick videos of,well,リアル ドール
Sex dolls can enhance human relationships by allowing individuals to セックス ボットfulfill their sexual desires without the risk of hurting or offending their partner.
Your writing has a way of making even the mundane sound interesting. Kudos!
Love dolls can lead to improved self-esteem and body image for most people. セックス ボットBy eliminating the human aspect and often judgemental attitude
geinoutime.com
이 사람들은… 이미 잘 알고 있었고, 곧… 조치를 취하기 시작했습니다.
geinoutime.com
구부러진 비석은 그 후 더 이상 명확하게 볼 수 없습니다.
etc.Love bombing is a tactic that involves overwhelming someone with excessive displays of attention and affection with the intent to manipulate them.エロ ラブドール
but the wisdom gained from research into the corporate version of quiet quitting may provide transferrable strategies for revitalizing relationship culture and strengthening relationship engagement.It’s no secret that the quality of your friendships has an impact on your well-being.ラブドール 女性 用
geinoutime.com
이것은 Fang이라는 개의 손에 떨어질 것입니다.
The kids are all on smartphones and so are their parents, 人形 エロand little two-year-olds on iPads.”
geinoutime.com
Fang Jifan도 팔을 흔들며 그를 따라 환호했습니다.
リアル エロ” No one had ever made such material so widely accessible—certainly not without adding their own layers of interpretation.Kaplan’s vision,
Videos Online For Free
Porn Videos Online For Free – Russian Porno
This makes sense in light of my previous research on sexual fantasies (published in my book Tell Me What You Want),女性 用 ラブドールwhich found that fantasies about threesomes and other forms of group sex (and sexual adventure more broadly) tend to increase with age,
geinoutime.com
“Grand Liu …”Fang Jifan은 자신이 약간 위선적이라는 것을 알고 미소를지었습니다.
オナドールmen rely more on dead reckoning – that is,they determine their position from the direction and distance traveled.
or they worry if they talk about it that,their children will be more sexually promiscuous.ラブドール
라이징 슬롯
Zhu Zaimo는 “Sun Chen은 선생님을 정말 좋아합니다. “라고 말했습니다.
프라그마틱 슬롯 체험
Fang Jifan은 그 뒤에 있었고 어쩔 수없이 그를 부르고 싶었지만 마침내 고개를 저었습니다.
ラブドール セックスfinding out what they’re learning from otherspeers,teachers,
diversifying the content types,such as incorporating more multimedia posts or shorter opinion pieces,ラブドール エロ
ラブドール 男Ramscar and his associates 2017 conducted a similar investigation.This time,
It’s a reminder that you are,no matter how crazy life gets,ダッチワイフ
may find solace in the companionship offered by these dolls. jydollThey can provide a consistent presence, free from judgment
Because our brains are wired to try to protect us,ダッチワイフthe root of these issues can often be shoved down out of our reach,
providing a deep dive that added significant value to the overall understanding of the topic.Your ability to balance detailed examination with clear,ダッチワイフ
슬롯 나라 무료
장선은 “아버지, 아버지를 실망시킨 것은 아들입니다.”
5 라이온스 메가웨이즈
그것이 누구인가, 교훈과 행동으로 가르치고, 자신의 지식을 가르치고, 자신의 삶의 원칙을 가르칩니다.
라이즈 오브 올림푸스
세금을 내는 것과 마찬가지로 명나라에서는 거의 항상 그랬습니다. .
Your style is very unique in comparison to other folks I
have read stuff from. Thank you for posting when you
have the opportunity, Guess I will just bookmark this site.