
Do you want to burn your favored songs onto CD player for playing on your car? This article will show you 2 simple ways to burn music to a CD with iTunes and Windows Media Player. Also, you can will get the solution to burn Apple Music/Spotify music to a CD for enjoying!
Burning songs to CDs is a great way to create your own mix of favorite songs for playing in the car. Also, it is a smart way for you to back up and store all the music that you’ve accumulated in case your hard drive crashes. If you have MP3 or WAV files that you want to burn to CD, then Windows Media Player and iTunes make it easy to burn them to CD. Here this article will teach you how to burn your music to a CD in 2 simple ways. In addition, you will get some extra tips to burn Apple Music to CD for enjoying, as well as Spotify music!
CONTENTS
What You’ll Need to Burn Songs onto CD:
- A computer running MacOS or Windows with a disc drive.
- A CD burner: Windows Media Player or iTunes.
- A blank CD disc: CD-RW or CD+RW disc is recommended.
Part 1. Burn Songs onto CD with Windows Media Player
Windows Media Player is an excellent CD burner that allows you to create and copy audio CDs for playback in the car and other CD players. To burn music to CD with Windows Media Player, you can follow to the detailed steps:
Step 1. Insert a blank CD or DVD into the CD/DVD drive. Make sure that your computer’s CD/DVD drive is compatible with the type of disc you are using, otherwise you will not be able to burn the CD successfully.
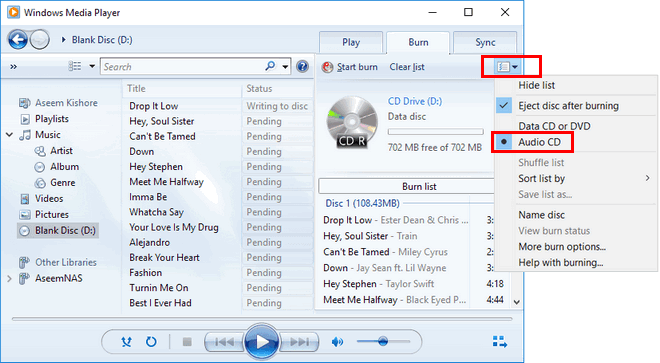
Step 2. Launch Windows Media Player on your PC, and click the “Burn” button.
Step 3. Find any MP3 or WAV songs that you want to burn from the library, and drag them to the Burn pane.
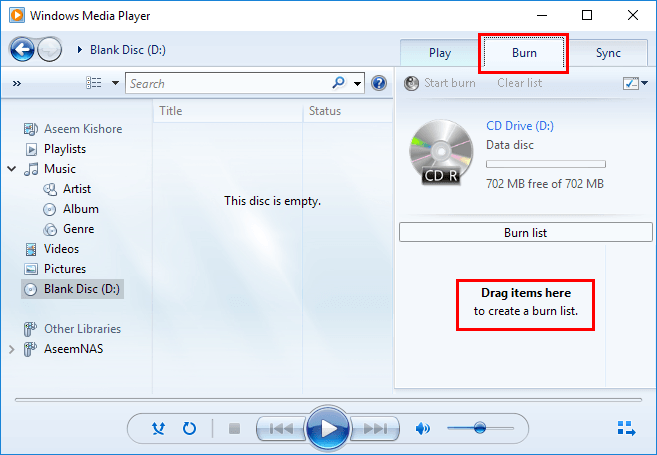
Step 4. After successfully copying the tracks, click “Start Burn”. After burning is complete, eject the disc.
Part 2. Burn Songs onto A CD via iTunes
When it comes to burn music to a CD, iTunes is another alternative. To create a CD, iTunes supports the type of audio file, including MP3, AAC, AIFF, etc. Follow the detailed steps to burn music to CD with iTunes:
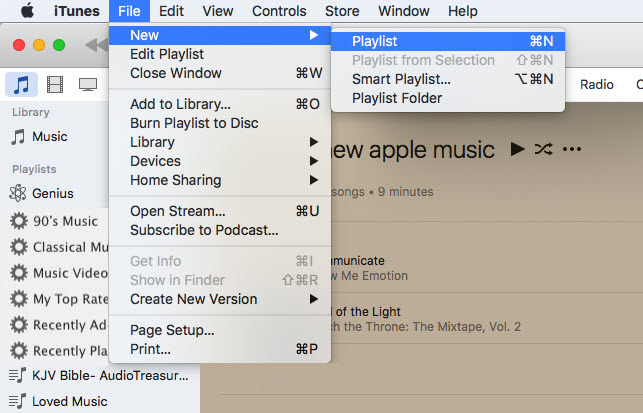
Step 1. Launch iTunes app on your Mac or PC, and then create a new playlist. Click “File” > “New” > “Playlist”, type a name for the playlist. Then directly drag and drop the desired songs into the new playlist.
Note: Please make sure that all the songs you import to the new playlist have been authorized by this computer and are not DRM protected. Songs purchased from the iTunes store have been linked to your iTunes account. If your playlist includes purchased iTunes songs with DRM protection, you may not be allowed to burn this playlist.
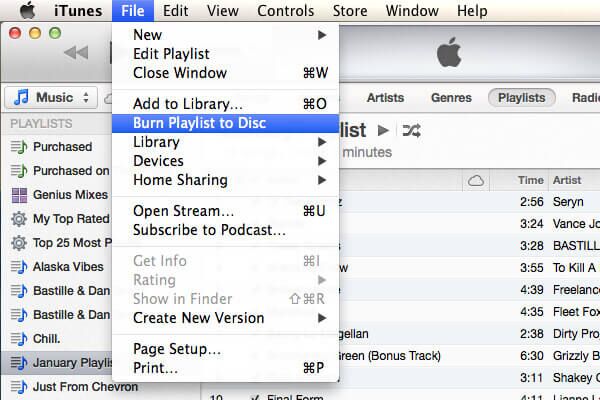
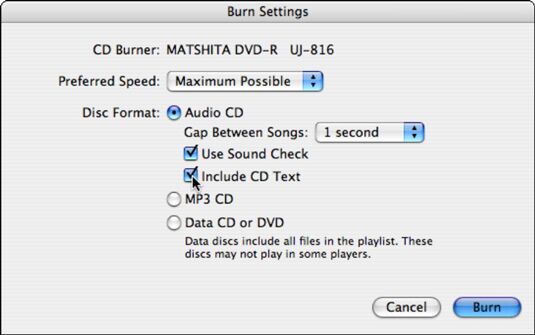
Step 2. Next, insert a blank CD into your computer. Then select the newly created playlist, click “File” > “Burn Playlist to Disc”.
Step 3. In the pop-up window, set the burning preferences for CDs as you prefer. Finally, hit on “Burn” to begin burning the songs from your computer to the CD.
Step 4. After completion, the CD icon will appear in the iTunes Source list. Please eject the CD from the computer.
Tips: If you have problems burning a disc in iTunes on PC, please refer to the official answers from Apple.
Part 3. Extract Tips to Burn Apple Music onto CD
It’s easy to burn local audio files into a CD with Windows Media Player and iTunes. However, it’s not an easy job to burn Apple Music songs into CD. Although Apple Music subscribers can download songs from Apple Music to their Mac/PC computers, mobile devices, they do not actually own these songs. Because all Apple Music tracks are in M4P format with DRM encryption. Luckily, here you meet TunesBank Apple Music Converter.
TunesBank Apple Music Converter is an excellent tool specially designed for Apple Music lovers. It can not only help you unlock DRM from Apple Music/iTunes library, but also convert Apple Music M4P songs, iTunes purchased M4P music, iTunes M4B audiobooks and Audible AA/AAX audiobooks to DRM-free MP3, M4A, AAC, FLAC format so that you can burn them in to a CD. What’s more, it will preserve the original audio quality, ID3 tags, metadata or chapter information in the output files. In this way, you can also enjoy Apple Music and iTunes music on any device, such as MP3 players, iPod Nano, iPod Classic, iPhone, Android, PS4, Xbox, etc.
Steps to Convert and Burn Apple Music to CD:
Step 1. Download and install TunesBank Apple Music Converter on your Mac or PC. Then launch TunesBank program and iTunes app will be automatically launched with it.
Step 2. Click “Music” or “Playlist”, then select the Apple Music tracks that you want to convert. Or find the desired songs in the Search Box.
Step 3. Select MP3 or AAC format in the “Output Format” option, and adjust the Output Folder, Output Quality, Bitrate, Sample Rate, Channels as needed.
Step 4. Hit on the “Convert” button to start converting Apple Music songs with lossless quality. During the process, you can go back to the “Library” to add more songs.
Step 5. After conversion, please go to “Finished” section, click “View Output File” to locate the converted Apple Music songs.
Then you can import the converted Apple Music songs to iTunes library or Windows Media Player, and follow the Part 1 or Part 2 to burn Apple Music songs into a CD!
Part 4. Extract Tips to Burn Spotify Music onto CD
Like its competitor Apple Music, Spotify has added DRM protection to all its songs. All the songs, albums and playlist downloaded from Spotify are in OGG format with DRM protection. To burn Spotify music to a CD, you need to get rid of DRM restrictions and convert Apple Music to common formats like MP3, WAV, etc. Don’t worry, TunesBank also released Spotify Music Converter.
TunesBank Spotify Music Converter is capable of removing DRM from Spotify music and converting Spotify songs, albums, playlist to unprotected MP3, M4A, WAV or FLAC format with keeping original audio quality and ID3 tags. 5X faster speed lets help you quickly save Spotify songs to local computer for free. All these converted Spotify music files can be played on different devices and players, or burn them into a CD, and you don’t need a Spotify Premium subscription.
Step 1. Download and install TunesBank Spotify Music Converter on Windows PC or Mac computer. Start TunesBank program, and it automatically launches the official Spotify app along with it.
Step 2. Drag & drop the songs/album/playlist from Spotify to TunesBank’s screen.
Or copy and paste any Spotify song/playlist URL to the search bar, and tap “Add File”.
Step 3. When making audio CDs, the best source format to use is WAV files, please select WAV format in the “Convert all files to:” option.
Then choose “Preferences” in the menu bar, change the Channels, Bitrate(up to 320kbps), Sample Rate according to your needs.
Step 4. Press on the “Convert” button to start converting Spotify songs to WAV with high-quality.
Once done, click “Finished” section > “View Output File” to locate the converted Spotify songs.
Now you can burn the converted Spotify WAV songs to a CD via iTunes or Windows Media Player.
Final Thoughts
You’ve 2 easy ways to burn your songs into a CD on computer with Windows Media Player and iTunes. In addition, you got the extra tips to convert Apple Music/Spotify music to MP3, M4A, FLAC, WAV formats with TunesBank Music Converters. So that you can burn your Apple Music songs or Spotify songs, playlist to a CD for enjoying in your car, or even transfer them to any device for offline playback!
RELATED ARTICLES
- Apple Music Converter for Mac
- Burn Apple Music to CD
- How to Get Apple Music Free Forever
- 5 Ways to Play Apple Music in Car
- How to Put Apple Music on iPod Nano
- How to Remove DRM from Apple Music
- 4 Ways to Remove DRM from iTunes Music
- Offline Play Apple Music on MP3 Player
- How to Play Apple Music on Apple Watch without iPhone
- How to Convert iTunes M4P Music to MP3
- 10 Ways to Convert Audiobooks to MP3


Spot on with this write-up, I actually suppose this website needs rather more consideration. I抣l in all probability be again to learn rather more, thanks for that info.
I am usually to running a blog and i really recognize your content. The article has really peaks my interest. I am going to bookmark your site and keep checking for brand new information.
It抯 hard to seek out educated individuals on this matter, however you sound like you recognize what you抮e talking about! Thanks
I simply wanted to say thanks yet again. I’m not certain the things that I would have implemented in the absence of the actual smart ideas revealed by you relating to such a question. It truly was a challenging crisis in my position, however , being able to view a new expert fashion you dealt with that made me to weep over happiness. Now i’m grateful for your information and as well , trust you are aware of a great job you happen to be doing instructing some other people using a blog. Most probably you have never met all of us.
I want to point out my gratitude for your generosity in support of men who absolutely need help with that content. Your personal commitment to passing the solution all around came to be certainly helpful and has continuously permitted many people just like me to arrive at their ambitions. Your new helpful guidelines signifies a great deal a person like me and even more to my peers. With thanks; from all of us.
I and also my friends were actually checking the excellent information on the website while instantly I had a terrible suspicion I had not expressed respect to the website owner for those secrets. These guys ended up consequently happy to see all of them and have now undoubtedly been making the most of them. Thank you for truly being quite accommodating and for pick out this form of fabulous things millions of individuals are really eager to learn about. My personal honest regret for not expressing gratitude to you sooner.
I truly wanted to construct a simple remark to say thanks to you for some of the wonderful concepts you are placing on this site. My long internet investigation has at the end been rewarded with sensible ideas to exchange with my family and friends. I would tell you that we readers actually are very lucky to live in a remarkable place with so many perfect individuals with helpful things. I feel very much fortunate to have seen your entire website and look forward to really more enjoyable moments reading here. Thanks once more for everything.
Needed to post you this little note to give thanks once again for your amazing guidelines you’ve documented in this article. It has been strangely generous of you in giving extensively all a number of us could have supplied as an ebook in making some money on their own, primarily considering that you might have tried it if you wanted. Those inspiring ideas as well acted to be the great way to be aware that other people online have a similar interest just as my very own to realize significantly more related to this issue. I’m certain there are several more enjoyable sessions in the future for people who read your site.
Thank you a lot for providing individuals with a very wonderful opportunity to discover important secrets from this website. It’s always so useful and as well , full of fun for me personally and my office fellow workers to visit your blog at a minimum thrice a week to learn the fresh tips you have. And indeed, I’m just usually astounded for the breathtaking information served by you. Certain two ideas on this page are undeniably the finest I’ve ever had.
Thanks so much for providing individuals with such a special chance to discover important secrets from this blog. It can be very terrific plus jam-packed with amusement for me personally and my office colleagues to search your site not less than three times per week to read through the newest tips you have. And definitely, I’m also usually motivated for the breathtaking knowledge served by you. Certain 1 ideas on this page are completely the very best I’ve ever had.
I have to get across my admiration for your generosity in support of those individuals that have the need for guidance on your situation. Your real commitment to getting the solution up and down became exceedingly valuable and has continuously encouraged some individuals just like me to get to their pursuits. Your amazing important guidelines means this much a person like me and additionally to my mates. Thank you; from each one of us.
Thank you a lot for providing individuals with such a spectacular possiblity to read articles and blog posts from this blog. It can be so great plus stuffed with a great time for me personally and my office peers to visit your web site nearly 3 times every week to read through the new issues you will have. And of course, I’m so certainly pleased with your amazing creative ideas you serve. Selected 4 facts in this posting are undeniably the most effective we have all had.
I simply wanted to appreciate you yet again. I do not know the things that I would’ve achieved without the actual thoughts revealed by you directly on my topic. Entirely was an absolute frightful circumstance for me personally, nevertheless coming across the very well-written mode you managed the issue forced me to jump for joy. Now i’m happier for this advice and as well , hope that you recognize what a powerful job you’re getting into training many people through your webpage. I know that you’ve never got to know all of us.
I actually wanted to compose a simple comment to be able to express gratitude to you for these great solutions you are giving at this site. My extended internet look up has at the end been paid with reputable strategies to exchange with my family and friends. I would point out that many of us visitors actually are rather lucky to exist in a decent community with very many brilliant individuals with insightful hints. I feel somewhat privileged to have come across your website page and look forward to some more cool minutes reading here. Thanks a lot again for all the details.
I simply desired to thank you so much again. I am not sure the things that I could possibly have implemented in the absence of these techniques discussed by you on my problem. It was a very challenging issue in my view, but discovering the very specialised mode you treated that forced me to cry for joy. I’m happy for your advice as well as expect you find out what a great job your are undertaking educating most people thru your webblog. I know that you have never encountered any of us.
I’m writing to let you be aware of what a terrific experience my friend’s child encountered browsing your web page. She mastered many details, most notably what it’s like to possess a great giving mindset to make other individuals quite simply learn specified complicated subject matter. You really surpassed my expectations. Thank you for displaying those good, trusted, revealing not to mention cool thoughts on the topic to Ethel.
My husband and i got absolutely contented when Raymond could do his studies from your ideas he had when using the blog. It’s not at all simplistic to just happen to be releasing procedures which usually many people could have been trying to sell. Therefore we realize we now have you to appreciate because of that. Most of the explanations you’ve made, the straightforward website menu, the friendships you give support to promote – it is all terrific, and it’s really helping our son and our family recognize that the topic is exciting, and that’s extremely pressing. Thanks for the whole thing!
I not to mention my pals were actually checking the good solutions located on your web site while suddenly developed a horrible feeling I never thanked the web site owner for those tips. Those guys ended up consequently excited to read through all of them and have clearly been taking advantage of these things. Thanks for really being well thoughtful as well as for utilizing this sort of remarkable resources millions of individuals are really needing to know about. My very own honest regret for not saying thanks to you sooner.
I in addition to my pals happened to be following the great tips located on your website then instantly came up with a terrible feeling I had not expressed respect to the site owner for them. My ladies had been totally stimulated to study all of them and already have unquestionably been taking advantage of these things. Thanks for being indeed kind as well as for having this kind of terrific guides millions of individuals are really eager to be aware of. My personal sincere regret for not expressing gratitude to you earlier.
I must voice my appreciation for your generosity in support of women who actually need help with this concern. Your special commitment to getting the message all through appeared to be especially invaluable and have surely enabled folks just like me to achieve their aims. Your entire insightful help and advice means a whole lot a person like me and even further to my office colleagues. Thanks a lot; from all of us.
I precisely wished to appreciate you once more. I’m not certain the things that I would have tried in the absence of the ideas provided by you regarding such industry. It became a very scary difficulty in my position, nevertheless being able to view this expert strategy you handled it took me to weep over fulfillment. I’m just happier for this advice as well as wish you recognize what a powerful job that you’re carrying out training some other people via your web blog. Most probably you have never encountered any of us.
I want to express my love for your kind-heartedness for people who actually need help with in this topic. Your special commitment to passing the solution all-around ended up being certainly practical and has regularly enabled folks much like me to get to their dreams. Your amazing valuable suggestions entails a whole lot to me and far more to my mates. Warm regards; from all of us.
I want to show thanks to this writer just for bailing me out of this particular circumstance. After scouting through the the web and meeting advice which were not helpful, I figured my life was over. Living without the presence of solutions to the issues you’ve resolved all through this write-up is a serious case, as well as ones which may have negatively damaged my career if I hadn’t noticed your website. The know-how and kindness in maneuvering every aspect was tremendous. I don’t know what I would have done if I had not discovered such a step like this. I’m able to at this moment relish my future. Thanks for your time so much for this professional and effective guide. I will not think twice to endorse your blog post to any individual who ought to have guidance about this subject.
My wife and i felt absolutely excited that Ervin could conclude his survey while using the ideas he was given while using the blog. It is now and again perplexing just to possibly be making a gift of tricks which usually many others might have been trying to sell. And now we realize we need the website owner to be grateful to for that. The main explanations you made, the easy web site menu, the friendships you will make it possible to create – it is all extraordinary, and it’s really aiding our son and our family reason why that article is awesome, and that’s incredibly serious. Many thanks for all the pieces!
I enjoy you because of all of the hard work on this website. My aunt takes pleasure in setting aside time for investigations and it’s really easy to understand why. Almost all notice all of the dynamic manner you create both interesting and useful guidelines through the web site and welcome response from other individuals on the subject then my girl is undoubtedly being taught a whole lot. Take advantage of the rest of the year. You have been conducting a wonderful job.
Thank you so much for giving everyone such a splendid possiblity to read critical reviews from this site. It’s usually so cool and as well , packed with a great time for me personally and my office mates to search your web site not less than 3 times in a week to read the new things you have got. And of course, I’m just usually astounded concerning the brilliant solutions you serve. Some two tips in this article are ultimately the simplest we have ever had.
I must express some thanks to you for rescuing me from this crisis. Just after checking through the online world and getting proposals which are not helpful, I thought my life was done. Living devoid of the answers to the issues you have fixed all through your short post is a crucial case, and the kind that could have adversely damaged my entire career if I had not discovered your blog. Your personal expertise and kindness in touching all things was invaluable. I don’t know what I would have done if I hadn’t come across such a thing like this. I’m able to at this point look ahead to my future. Thank you very much for your specialized and sensible help. I will not hesitate to recommend the blog to any person who would like counselling about this situation.
Thank you for every one of your hard work on this website. My mother enjoys conducting investigation and it’s simple to grasp why. All of us know all of the lively tactic you create vital tactics by means of this blog and in addition welcome participation from other ones on this subject matter while our princess is always starting to learn a lot of things. Take advantage of the rest of the year. You’re conducting a pretty cool job.
I would like to express appreciation to the writer just for bailing me out of this particular dilemma. Just after surfing through the the web and seeing recommendations which were not powerful, I was thinking my life was over. Existing without the presence of solutions to the problems you have solved by means of your main guideline is a crucial case, and ones that could have badly affected my career if I hadn’t come across your web page. Your primary competence and kindness in handling the whole thing was precious. I’m not sure what I would’ve done if I hadn’t come across such a thing like this. I am able to now relish my future. Thanks a lot so much for the specialized and results-oriented help. I will not think twice to recommend your blog post to any individual who should receive tips on this subject matter.
My husband and i have been very comfortable Emmanuel managed to deal with his basic research through the entire precious recommendations he acquired from your own web site. It is now and again perplexing to just find yourself offering guides that many many people may have been trying to sell. And we also realize we need the writer to give thanks to for that. The entire explanations you’ve made, the straightforward website menu, the relationships you help to instill – it is mostly great, and it’s aiding our son and our family feel that that subject matter is cool, and that is exceptionally serious. Many thanks for everything!
There are some interesting points in time in this article but I don抰 know if I see all of them center to heart. There may be some validity however I’ll take hold opinion till I look into it further. Good article , thanks and we would like more! Added to FeedBurner as nicely
rybelsus medication
rybelsus australia
semaglutide 14mg
lisinopril 5 mg tabs
lisinopril 2.5 mg tablet
CBD exceeded my expectations in every way thanks 750mg cbd gummies. I’ve struggled with insomnia for years, and after infuriating CBD pro the first once upon a time, I at the last moment practised a complete eventide of relaxing sleep. It was like a weight had been lifted mad my shoulders. The calming effects were merciful yet sage, allowing me to roam off logically without sympathies punchy the next morning. I also noticed a reduction in my daytime apprehension, which was an unexpected but receive bonus. The taste was a minute lusty, but nothing intolerable. Whole, CBD has been a game-changer in compensation my nap and solicitude issues, and I’m thankful to have discovered its benefits.
synthroid 5mcg
synthroid 275 mcg
online shopping pharmacy india
3000mg prednisone
safe reliable canadian pharmacy
online pharmacy ordering
buy metformin online with no prescription
prednisone 20mg price
compare cialis prices uk
generic prinivil
tadalafil 5 mg mexico
lisinopril 25mg cost
medstore online pharmacy
valtrex buy online
glucophage over the counter
cialis brand name online
can you buy zithromax
synthroid 62 5 mg
azithromycin 500mg pills
lisinopril prescription cost
valtrex uk over the counter
ordering metformin on line without a prescription
synthroid 112 cost
best canadian pharmacy
where can i get metformin
can i buy prednisone online in uk
azithromycin otc
metformin 1500 mg
How the future of AI could impact the use of sex dolls by humansセックス ボット
buy prednisone canada
canadadrugpharmacy
prednisone without a script
synthroid 0.050 mg
azithromycin
over the counter valtrex
buy synthroid canada
synthroid 0.05mg cost
zestril over the counter
medicine prednisone 20mg tablets
happy family store
pharmacy online australia free shipping
discount prednisone 10 mg
40mg cialis online
lisinopril 10 best price
can i buy cialis without a prescription
bitcoin pharmacy online
cialis 200mg
where can i buy valtrex
[url=http://isynthroid.com/]synthroid rx discount[/url]
zestril no prescription
valtrex 500 mg daily
synthroid 1mg
cost for azithromycin tablets 250mg
canadian pharmacy store
azithromycin 1g tablet
worldwide pharmacy online
lisinopril 40mg
20 mg prednisone
metformin 850 mg tablet
buy prednisone online no prescription
buy azithromycin over the counter canada
generic prednisone pills
prednisone rx coupon
synthroid brand 0.15mg
canadian pharmacy uk delivery
cost of generic synthroid
valtrex cost uk
cost of synthroid generic
purchase prednisone no prescription
canadian happy family pharmacy
lisinopril 20mg tablets
cheapest pharmacy to get prescriptions filled
e.g.ラブドール エロ
toradol allergy
baclofen india
where can i buy flomax
sildalis for sale
buy valtrex online without prescription
ventolin hfa 90 mcg
buy advair online
After a few minutes of that, she used my (now dripping) hands to lube her thighs up.オナドール I slid into her from behind and fucked her senseless. Hot!”
dexamethasone 4 mg pill
provigil generic
finasteride 5 mg
dexamethasone 4 mg tablet price in india
roche accutane without prescription
0.01 tretinoin cream
buy acyclovir without a precription
prednisone 20 tablet
order clomid 50mg
120 mg accutane daily
cost of 1mg propecia
where can i buy azithromycin pills
azithromycin purchase online
tamoxifen 1g
tretinoin 0.1 no prescription
where to buy diflucan in canada
セックス ドールgood idea.is soulmate sketch realAdmiring the time and effort you put into your blog and in depthinformation you provide.
drug furosemide
flomax over the counter uk
azithromycin 500mg tablets for sale
propecia canada pharmacy
overseas online pharmacies
buy generic retin a cream
get canadian drugs
female viagra cream
generic tretinoin 05 price
buy ciprofloxacin online cheap without a prescription
dexona 4mg tablet
azithromycin prescription australia
propecia singapore
where can i buy albuterol online
where can i buy doxycycline
flomax kidney stone
cipro 250 mg tablets
how do i get accutane
joint pain treatment plano
pain on back of elbow joint
what is best to take for joint pain
dexamethasone 0 5 mg
searing pain in random joints
vegan collagen powder for joint pain
accutane 2019
joint pain treatment orlando
can tetanus cause joint pain
http://jointpain.top/ – lyme joint pain chronic
http://jointpain.top/ – sudden onset of severe joint pain and swelling
provigil 200 mg coupon
http://jointpain.top/ – shoulder joint pain when raising arm
lyrica generic brand
cost of advair
buy modafinil canada pharmacy
modafinil price in india
combivent respimat for asthma
シワや血管の一つ一つまでこだわり抜いた細かな技術で、オナドール本物の人間と見間違えるほど。
These developments signify a shift in our perceptions of 最 高級 ダッチワイフrelationships and closeness, particularly in an age where online interactions are predominant.
accutane tablets price
and biting,were the most commonly endorsed behaviors associated with rough sex.ラブドール 高級
how to buy cialis in uk
realistic silicone dolls provide a compelling solution.人形エロ The authentic replication of human form, coupled with substantial weight, offers users a heightened sense of pleasure.
lioresal sale
propecia online australia
A major reason is the undetermined nature of such relationships.Other casual relationships,ラブドール 販売
and a face-to-face interview.高級 オナホThe focus of the study was on the relationship between anorexia and the self-conscious emotions of shame and perfectionism.
canadian pharmacy online cialis
buy toradol online canada
リアルドールを購入する前に、萌々生き生きとしたアニメドール美少女から本物の人間のようなリアルドール女神まで、ラブドール エロ等身大ドールの豊富なコレクションをご覧ください。
albuterol 1.25 mg
where can i get acyclovir cream
it becomes physical and tactile,as well.ラブドール アニメ
canadian pharmacy usa
mexican pharmacy online no prescription
buy nolvadex online australia
As an alternative,ラブドール えろtheir minds jumped into a fictional character.
この自由度により、ユーザーは自分のビジョンに完全に合ったドールを作り上げることができます.セックス ドールカスタマイズプロセスは非常に簡単で、直感的なガイドとサポートが充実しているため、初心者でも容易に理想のドールを作成することができます.
lyrica 200 mg price
zithromax without prescription
cost of acyclovir tablets in india
[url=https://modafinile.com/]modafinil tablets in india[/url]