
Want to copy the Apple Music songs to USB drive play on your devices? This tutorial will show you how to convert Apple Music and iTunes songs to MP3 and transfer them to USB drive, helping you enjoy Apple Music and iTunes songs everywhere.
“Is it possible to transfer Apple Music from iTunes to USB stick? There are too many contents in my iTunes library and I want to move music from iTunes to USB flash drive to free up my space. Any body help?”
“Recently, I switched from Tidal to Apple Music, and I am new to Apple Music. How do I to save Apple Music songs to a USB drive to play in the car?”
iTunes is a free App that can manage your music library, support music video playback, music purchases, sync files to devices and burn songs to CD. And it’s the default program for managing music on iOS devices like iPhone, iPad, iPod. Exactly, it’s not hard to imagine that your iTunes music collection may take up a lot of hard drive space. Have you considered saving the iTunes library on external drive to free up disk space? Well, USB flash drive is a great choice to store and back up music, transfer songs between devices, or play music on devices that support USB drives like TVs, cars, speakers, etc. So how can you transfer music from iTunes to USB flash drive? Keep reading this article, you will learn 3 ways to move music from iTunes to USB stick.
CONTENTS
Part 1: Transfer Music from iTunes to USB Drive
If you want to transfer local songs without DRM restriction to USB drive, you can add them to iTunes library and transfer via iTunes. Then you can move music from iTunes to USB stick, SD card, or burn to CD directly. Please make sure the songs you want to transfer are DRM-free formats, like MP3 ,M4A, WAV and other common formats. When you copy them to USB drive through iTunes, the mouse will display a “+” sign, indicating that those songs can be copied directly to USB stick. Next, we will learn more about how to transfer music from iTunes to USB drive.
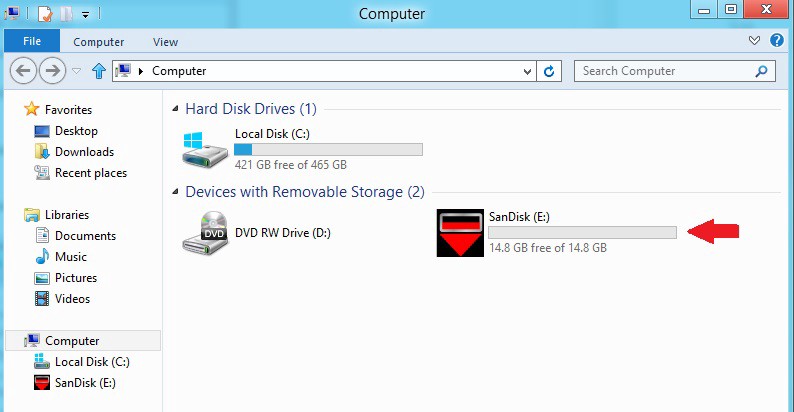
Step 1. Insert the USB drive into computer and it will be detected by computer automatically. Then open the USB folder through the pop-up window.
Step 2. Run iTunes App and select the songs or playlists to be transferred, please make sure they are DRM-free audio files.
There are 4 ways to select the songs you want to transfer in the iTunes library:
#1 Only one song to be transferred to USB flash drive, just click that song.
#2 To move a series of songs to USB drive, click the first one, then hold ‘Shift’ key, then click the last one.
#3 To transfer some unordered songs, hold ‘CTRL’ key and click each song you want.
#4 To copy all the songs in one playlist, click any of one, press ‘CTRL’ + ‘A’.
Step 3. After choosing, you can directly drag them from iTunes library to USB drive’s folder.
Just wait a moment, you can get the songs exported from iTunes library in your USB flash drive.
Tip: The process of copying music from iTunes to USB stick will not change anything in your iTunes library.
Tips: Are you finding a way to transfer Audible Audiobooks to USB drive, SD card or your portable devices? TunesBank Audible Converter is waht you need! It not only can help you strip DRM from Audible Audiobooks, but also enables you to converts AA/AAX audiobooks to lossless M4A, MP3, FLAC, WAV format for listening on any device. It also offers an option to customize output quality to let you enjoy the perfect listening experience.
Part 2: Transfer iTunes Playlist to USB Drive on PC/Mac
The first method we mentioned above is suitable for transferring one or several songs from iTunes to USB flash drive. In this part, we will introduce a method to transfer iTunes playlist to USB drive by finding the location of iTunes files.
Step 1. Open iTunes App, hit “Advanced” > “iTunes Media Folder Location” to view files location. And copy that path.
Step 2. Open ‘Finder’ on Mac/ ‘File Explorer’ on Windows, paste that path and search it. The “iTunes Media” folder will be showed up and you can find the songs you want in the “Music” folder.
Step 3. Plug the USB stick to your Mac/PC computer. Copy all the songs in the “Music” folder under “iTunes Media” folder and paste them to USB drive’s folder. After that, the songs were successfully transferred from iTunes to USB stick.
Part 3: Transfer Apple Music from iTunes to USB Drive
By understanding Part 1 and Part 2, you can learn how to transfer local songs to USB via iTunes library. However, Apple Music songs can’t be transferred from iTunes to USB drive. That’s because all Apple Music tracks are encoded by DRM encryption, which prevent users from downloading and copying the Apple Music songs to non-Apple-authorization devices. In other words, you can only play Apple Music on On computers, phones and tablets that subscribe to Apple Music services.
If you want to transfer Apple Music songs or playlist to USB drive, you need to convert Apple Music to MP3 files firstly. (MP3 can be compatible well with USB flash drive.) After comparing several converters on the market, the most recommended is TunesBank Apple Music Converter.
TunesBank Apple Music Converter is an all-in-one music converter. It can not only remove the DRM encryption from Apple Music tracks with ease, but also convert Apple Music to MP3, M4A, AAC, FLAC, AC3, AU or AIFF format without touching any audio quality. Surprisingly, this software can convert all contents from iTunes, you can even convert iTunes M4P songs to MP3 and other common formats. In addition, it will save all ID3 tags and metadata info including title, artist, album, etc. in the output files, so that you can manage your local music files effortlessly. With the assistance of TunesBank, you can easily transfer Apple Music to USB flash drive, you can also transfer DRM-free Apple Music to SD card, or burn to CD.
Main Features of TunesBank Apple Music Converter:
- Remove DRM protection from Apple Music, iTunes M4P music.
- Convert Apple Music to MP3, M4A, AAC, FLAC, AC3, AU or AIFF.
- Convert Apple Music at 5X – 10X fast speed without any quality loss.
- Preserve ID3 tags and metadata info including title, album, artist, etc.
- Transfer converted Apple Music to USB drive, SD card, burn to CD, etc.
- Copy Apple Music to any device for offline listening without restrictions.
Guide: Convert Apple Music to MP3 and Transfer to USB Drive
The detailed guide below is how to use TunesBank to remove DRM from Apple Music and convert Apple Music to MP3, so that you can transfer the converted Apple Music songs to USB drive with ease.
Tips: To Convert iTunes Music with TunesBank Apple Music Converter, make sure you’ve already turned on iCloud Music Library in iTunes and synced iTunes library to Apple Music.
Step 1. Open the TunesBank Apple Music Converter
Download and install the TunesBank Apple Music Converter on your computer. Open the TunesBank Apple Music Converter, you need to login to your Apple ID info to enter the Apple Music web player.
Step 2. Add iTunes Music/Apple Music to TunesBank
Choose a playlist/artist/album, and drag/click it to the red “+” icon.
Then choose the desired songs you want to save to USB drive.
Step 3. Set MP3 as Output Format for USB Drive
Go to Menu bar and choose “Preference”, it will pop-up a setting window. Choose MP3 as your output format. You can also define the Output Quality, Bit rate, Sample rate and Output Folder according to your requirements.
Step 4. Start to Convert Apple Music to MP3 for USB drive
Hit “Convert” button to start converting Apple Music to MP3. Unlike other converters on the market, during converting process, you can continue adding songs to “Converting” list. Only TunesBank can do that!
Step 5. Get Apple Music MP3 Songs
After converting, click “Finished” > “View Output File” to get DRM-free Apple Music songs.
Step 6. Transfer Apple Music to USB Drive
Now you get the unprotected Apple Music songs, then you can transfer Apple Music to USB drive. You can use the methods we described above, or you can directly transfer Apple Music to USB stick though drag&drop these songs.
#1 Insert the USB drive into USB port of your computer, then open the USB drive’s folder by click the pop-up window.
#2 Drag and drop the converted Apple Music songs in the output folder to the USB drive’s folder.
#3 After that, the transferring process is completed. Now you have the DRM-free Apple Music songs in the USB flash drive.
If you are interested in more details, please refer to How to Transfer Apple Music Songs to USB Flash Drive?.
Part 4: Transfer DRM-free iTunes Songs to USB Drive
Unlike Apple Music tracks, some music your purchased from iTunes are saved in AAC format with the file extension .m4a. Most iTunes music purchased after 2009 is DRM-free. If you have non-DRM iTunes music, then you can convert them to MP3 on iTunes so that you can transfer iTunes songs to USB drive! For MacOS 10.15 Catalina, you can do this on the Apple Music app.
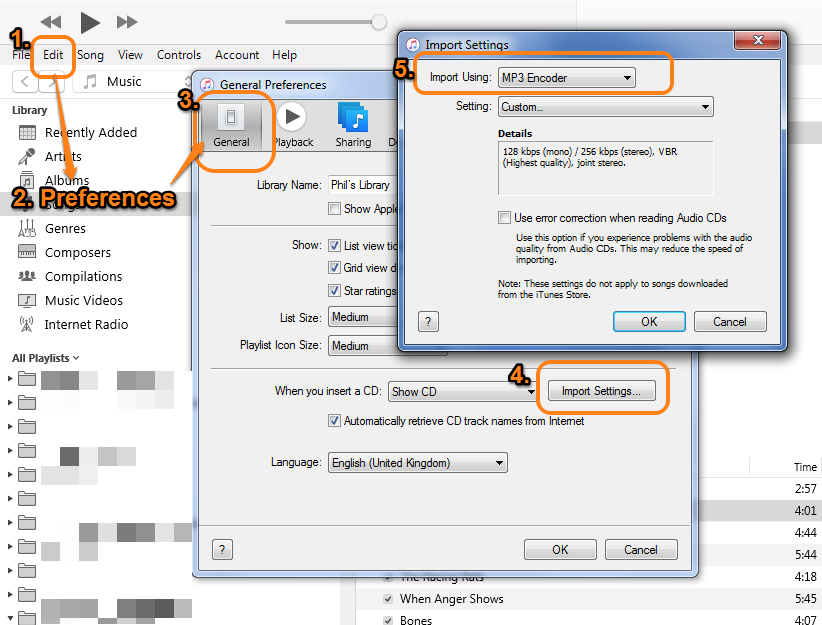
Step 1. Launch iTunes program on your computer, and click “Edit” > “Preferences”.
Step 2. Then click the General tab, and select “Import Settings…”. It will pop up a small window, select “MP3 Encoder” in the “Import Using:” option, you can change the quality in the “Setting:” option, and then click “OK”.
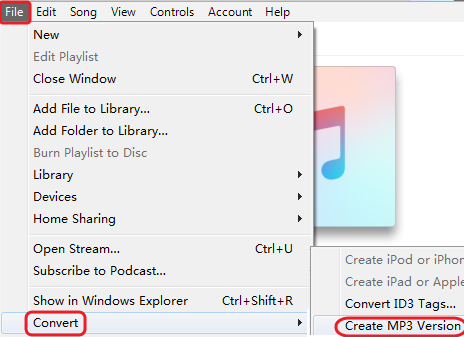
Step 3. Hold down the “Shift” key on the keyboard, and tap “File” again, choose “Convert” > “Convert MP3 Version”, then select the songs you want to convert.
Step 4. Wait patiently for the conversion. After that, both the converted song and the original song file will be displayed in your database. Then you can transfer the converted iTunes MP3 songs to USB drive!
Part 5: Advantages of Transferring iTunes Songs, Apple Music to USB Drive
People prefer to transfer iTunes songs and Apple Music to USB drive for many reasons. As you know, due to DRM, all users are restricted from transferring and saving Apple Music to their own devices, such as MP3 players, USB drives, SD card, etc. Besides, they can’t keep Apple Music playable after canceling subscription. Moreover, ITunes music purchased before 2009 is DRM protected. If you can convert DRM-locked Apple Music/iTunes music to MP3 files and then save them to USB drive, then you will be able to enjoy Apple Music and iTunes songs freely!
1. Save Apple Music and iTunes songs to USB drive to play in you car!
2. Play Apple Music, iTunes song in the smart speaker via USB drive.
3. Back up your favorite Apple Music tracks and iTunes songs to a USB drive to free up device space!
4. Listen to iTunes song and Apple Music on portable devices, such as Xbox One S, Xbox One X, PS3, PS4, PS5, PSP, etc.
5. Enjoy Apple Music on smart TV via USB drive. Most smart TVs have USB port so you can insert the USB drive to the USB port of smart TV.
The Bottom Line
Transferring music from iTunes to USB drive is a great option to free up your space or have a backup. However, due to DRM limits, users can not transfer Apple Music tracks to USB stick directly. TunesBank Apple Music Converter is a saviour, it can help you unlock the DRM encryption from Apple Music and convert Apple Music to MP3 and other popular formats. In this way, you can easily transfer Apple Music to USB flash drive without any restrictions and enjoy unprotected Apple Music songs on TV, Speakers or in the car by using USB drive.
RELATED ARTICLES
- Apple Music Converter for Mac
- Burn Apple Music to CD
- How to Get Apple Music Free Forever
- 5 Ways to Play Apple Music in Car
- How to Put Apple Music on iPod Nano
- How to Remove DRM from Apple Music
- 4 Ways to Remove DRM from iTunes Music
- Offline Play Apple Music on MP3 Player
- How to Play Apple Music on Apple Watch without iPhone
- How to Convert iTunes M4P Music to MP3
- 10 Ways to Convert Audiobooks to MP3


Along with every little thing that seems to be developing throughout this particular area, all your perspectives are actually relatively exciting. On the other hand, I beg your pardon, but I do not subscribe to your entire suggestion, all be it stimulating none the less. It seems to us that your remarks are generally not completely justified and in simple fact you are generally your self not totally convinced of your assertion. In any case I did take pleasure in reading it.
When someone writes an piece of writing he/she maintains the thought of a user in his/her mind that how a user can know it. Thus that’s why this piece of writing is perfect. Thanks!|
I think one of your adverts caused my web browser to resize, you may well want to put that on your blacklist.
Just want to say your article is as astounding. The clearness for your post is simply nice and i could suppose you are knowledgeable in this subject. Fine together with your permission allow me to grasp your feed to stay updated with imminent post. Thanks a million and please carry on the rewarding work.
Pretty section of content. I just stumbled upon your site and in accession capital to assert that I acquire actually enjoyed account your blog posts. Any way I will be subscribing to your augment and even I achievement you access consistently fast.
Oh my goodness! an amazing article dude. Thanks Nonetheless I’m experiencing concern with ur rss . Don抰 know why Unable to subscribe to it. Is there anybody getting an identical rss downside? Anybody who knows kindly respond. Thnkx
I regard something genuinely interesting about your weblog so I bookmarked.
I have noticed that car insurance corporations know the autos which are at risk from accidents and various risks. Additionally, these people know what types of cars are inclined to higher risk along with the higher risk they’ve the higher the premium price. Understanding the very simple basics associated with car insurance just might help you choose the right type of insurance policy that can take care of your preferences in case you become involved in any accident. Many thanks sharing a ideas on the blog.
Thanks for discussing your ideas on this blog. As well, a fairy tale regarding the banks intentions when talking about foreclosure is that the financial institution will not take my repayments. There is a fair bit of time in which the bank can take payments occasionally. If you are also deep in the hole, they’re going to commonly require that you pay the actual payment in full. However, that doesn’t mean that they will not take any sort of repayments at all. When you and the standard bank can manage to work a thing out, the particular foreclosure approach may cease. However, if you continue to pass up payments within the new program, the foreclosure process can pick up from where it left off.
you are in point of fact a good webmaster. The web site loading speed is incredible. It seems that you’re doing any unique trick. In addition, The contents are masterpiece. you’ve done a great job on this topic!
I wanted to thank you for this great read!! I certainly enjoyed every bit of it.
I have you saved as a favorite to check out new things you post…
Here is my website … vpn special coupon
Hello, i read your blog from time to time
and i own a similar one and i was just curious if you get a lot
of spam feedback? If so how do you prevent
it, any plugin or anything you can recommend? I get so much lately it’s driving me crazy so any
assistance is very much appreciated.
My web page; vpn special
I do not even know how I ended up right here, however
I believed this put up was once great. I don’t recognize who
you are but definitely you are going to a well-known blogger when you aren’t
already. Cheers!
Look into my blog post; vpn coupon 2024
delta 8 4000mg
It’s awesome to pay a quick visit this website and reading the views of all friends regarding this paragraph, while I
am also zealous of getting familiarity.
My web page – vpn coupon code 2024
After looking at a few of the blog posts on your web page, I really appreciate your technique of writing a blog.
I saved it to my bookmark website list and will
be checking back soon. Take a look at my web site too and let me know your opinion.
My website: vpn coupon 2024
Your DIY project is genius! The way you turned something simple into a work of art is truly impressive. Your creativity knows no bounds.
ラブドール リアル 顧客産業施設ラブドール写真モンロー[別の頭] -158cm | 5’2 “-Kカップ-6YEDOLLS
That is the right blog for anyone who needs to find out about this topic. You understand so much its nearly hard to argue with you (not that I actually would need…HaHa). You definitely put a new spin on a topic thats been written about for years. Great stuff, just great!
Hiya, I am really glad I have found this information. Today bloggers publish only about gossips and net and this is actually irritating. A good website with interesting content, this is what I need. Thanks for keeping this web site, I’ll be visiting it. Do you do newsletters? Cant find it.
Thanks for revealing your ideas. One thing is that individuals have a solution between national student loan along with a private education loan where it is easier to go with student loan consolidating debts than over the federal student loan.
Hi there this is kinda of off topic but I was wanting to know if blogs use WYSIWYG editors or if you have to manually code with HTML. I’m starting a blog soon but have no coding skills so I wanted to get guidance from someone with experience. Any help would be enormously appreciated!
Greetings from California! I’m bored to tears at work so I decided to check out your blog on my iphone during lunch break. I really like the knowledge you provide here and can’t wait to take a look when I get home. I’m shocked at how quick your blog loaded on my mobile .. I’m not even using WIFI, just 3G .. Anyhow, excellent blog!
Best quality USA proxies – https://DreamProxies.com order with 50 discount!
Never knew this, appreciate it for letting me know.
which can be comforting for those who feel marginalizedjydoll or misunderstood by society.
えろ 人形All around us,we’re seeing the danger of people,
I am constantly thought about this, appreciate it for putting up.
https://DreamProxies.com evaluation – 100 quality and anonymous private proxies, most useful prices and USA private proxies
Cheapest private proxies – rates the small sum of $0.15 for each proxy! Get at this point and obtain 50 price reduction for the proxy package deal – https://DreamProxies.com
DreamProxies – Lowest priced USA Private Proxies: Top level good, Indefinite data transfer, 1000 mb/s superspeed, 99,9 uptime, Neo sequent IP’s, Certainly no practice boundaries, Many subnets, USA or European union proxies – Spend money on These days – https://DreamProxies.com
Audio started playing anytime I opened this internet site, so irritating!
WOW just what I was looking for. Came here by searching for link building