








 United States (English)
 Japan (日本語)
 Russia (русский)
 Germany (Deutsch)
 France (Français)
 Spain (Español)
 Italy (Italia)
 Portugal (Portugues)
 China (繁体中文)
 Turkish (Türk dili)
 Dutch (Nederlands)
 Korean(한국인)
 Saudi Arabia(عربي)
 Download HD movies & TV shows from Disney Plus.
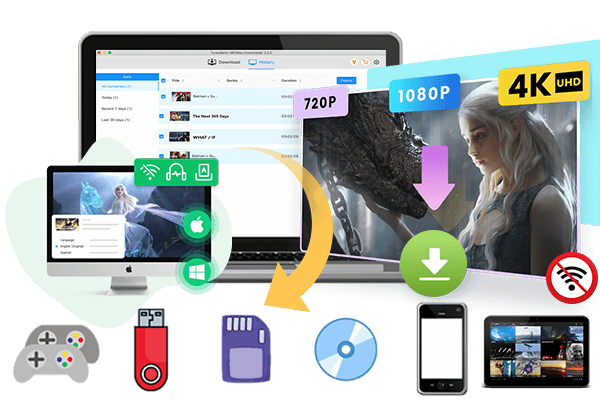
This article covers two methods you can use to record Disney+ videos with OBS with no black screen, or to download Disney+ videos directly to your computer. Watch your favorite Disney+ movies and TV shows offline on your computer without network connection and Disney+ app!
Disney Plus is a treasure trove of movies and shows, but it doesn’t let you download Disney Plus movies on MacBook or Windows laptop. In such case, you may want record Disney Plus for offline viewing. Have you ever tried to record Disney+ with OBS? OBS Studio is a free, open-source screen recorder for Windows, Mac, and Linux. It allows users to capture desktop activities, app windows, webcams, and audio sources.
However, when you try to record Disney Plus with OBS, you may encounter a black screen if you’re unfamiliar with the setup. In this guide, we’ll show you how to record Disney Plus in OBS successfully, troubleshoot the black screen error, and explore an alternative solution. You can also use a professional tool, TunesBank DisneyPlus Video Downloader, to download Disney+ videos to your computer for offline viewing.
How to Record Disney Plus with OBS Without Black Screen?
Disney Plus is a streaming OTT platform. It uses content protection technology to prevent unauthorized copying and distribution of its movies and TV shows. When you use OBS to record protected videos on Disney+, the platform blocks it, leaving you with a blank recording. The key to record Disney Plus without a black screen is disabling hardware acceleration in both your browser and OBS Studio.
Here’s how to record Disney+ with OBS without black screen.
Step 1. Disable Hardware Acceleration in Your Browser
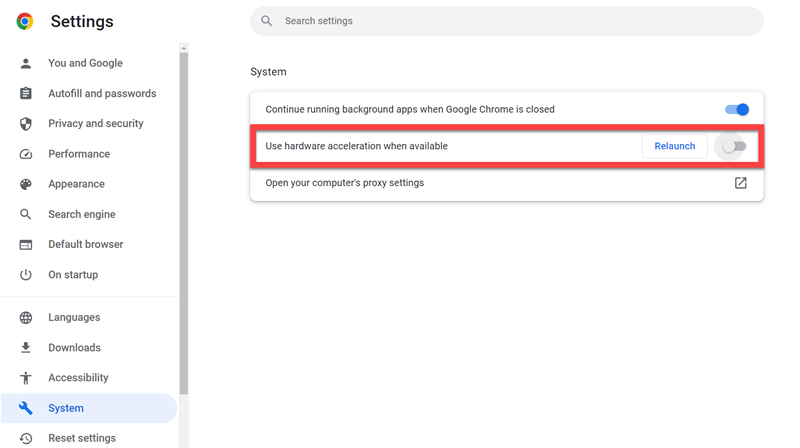
For Chrome: Go to “Settings” > “System” and disable “Use graphics acceleration when available.”
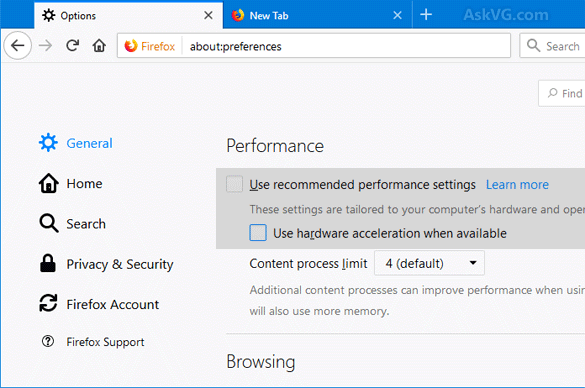
For Firefox: Go to “Settings” > “General” > “Performance”, uncheck “Use Recommended Performance” and “Use hardware acceleration when available.”
For Edge: Go to “Settings” > “System and Performance”, and turn off “Use graphics acceleration when available.”
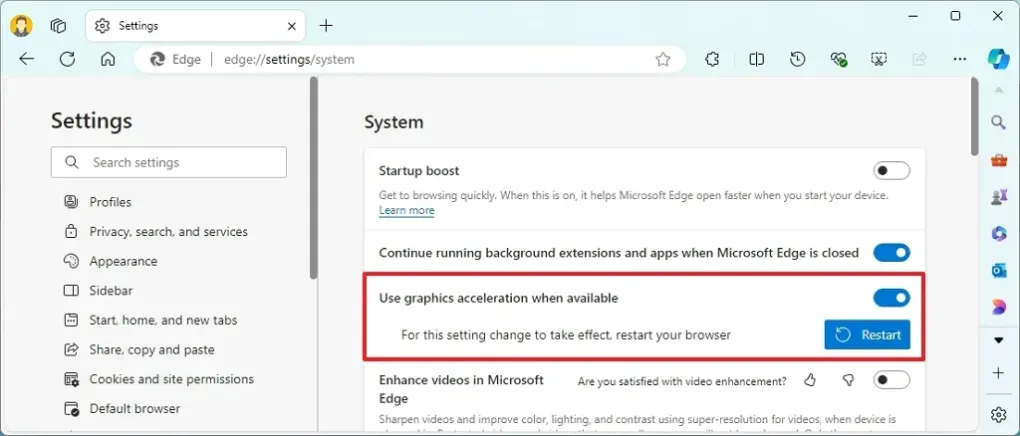
Then restart the browser.
Step 2. Turn Off Hardware Acceleration inside OBS
Download and install OBS Studio to your computer from its official OBS website.
Open OBS Studio, go to “Settings” > “Advanced”, scroll to “Sources”, and uncheck “Enable Browser Source Hardware Acceleration.” Click “Apply”, then “OK”, and restart OBS .
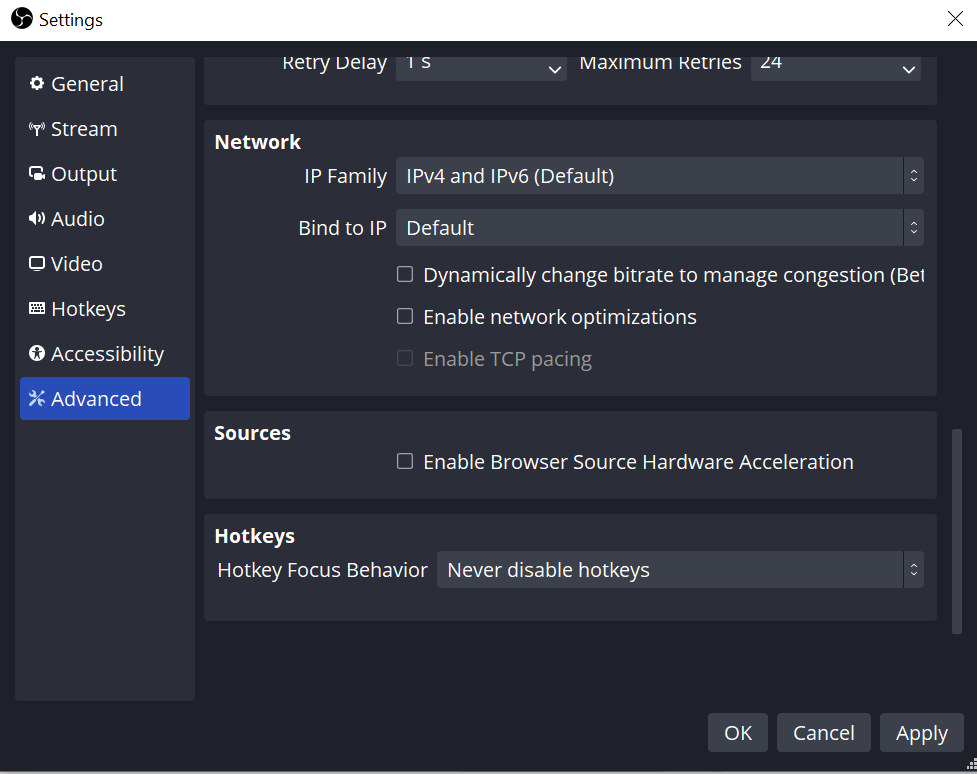
Step 3. Create a New Scene in OBS
In the OBS interface, locate the “Scenes” panel in the bottom-left corner. Click the “+” icon to create a new scene. Enter a name for your scene, and click “OK” to save it.
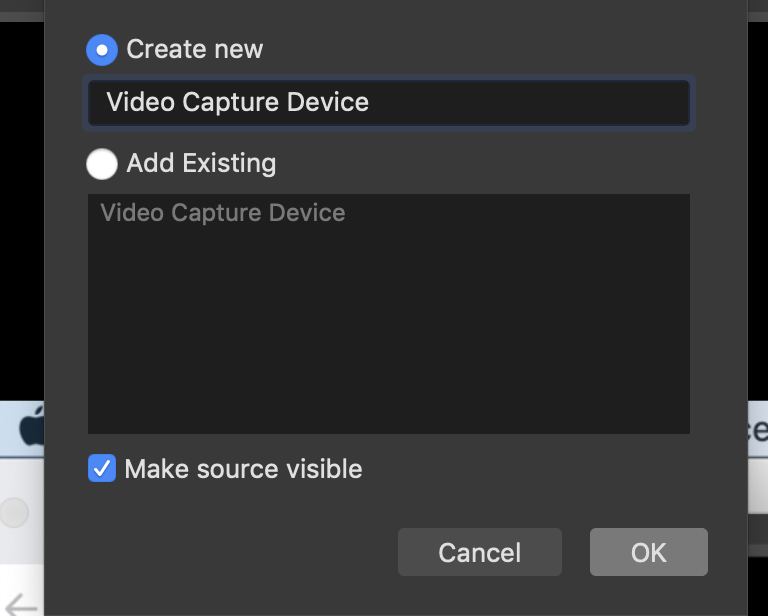
Step 4. Add a New Capture Source
In OBS, click the “+” button under “Sources” and select “Display Capture” for the whole screen or “Window Capture” for the browser. Select your screen and click “OK” after configuring the source.
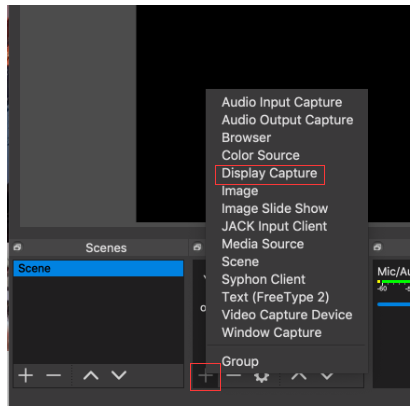
Tips: If you are using the new version of OBS, you ought to choose “macOS Screen Capture”.
Step 5. Configure Recording Settings
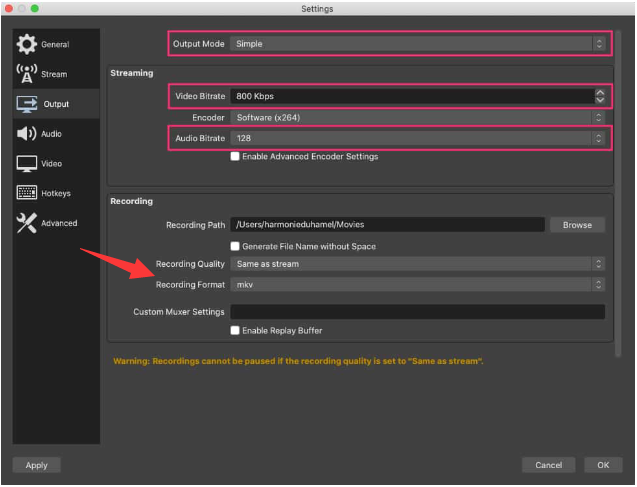
Click “Settings” in the bottom-right corner of OBS and tap the “Output” tab. Under Recording, choose your preferred recording format, encoder, and recording path. Next, open the “Video” tab to adjust the output resolution, and frame rate, etc.
Step 6. Start Recording Disney Plus in OBS
Play a Disney Plus movie or TV series in windowed mode (avoid full-screen to reduce DRM detection), then click “Start Recording” in the Controls panel.
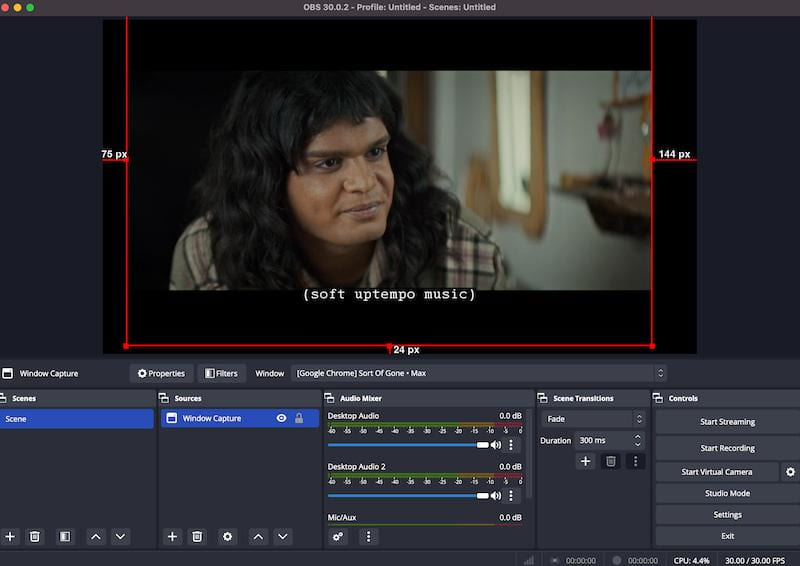
When finished, click “Stop Recording”. Your video will be saved automatically to the recording folder you selected.
How to Download Disney Plus Videos on Mac/PC Directly?
Screen recording Disney Plus with OBS is time-consuming, you must wait for the entire video to play in real time, and the output quality may be compressed or suffer from dropped frames. Even worse, you may encounter black-screen errors or even risk account restrictions when recording on Disney Plus.
TunesBank DisneyPlus Video Downloader is here to help. This desktop tool features a built-in web browser that lets you log into Disney Plus to access the official library inside the software. With it, you can download unlimited Disney+ movies and shows directly to your Mac or PC as local MP4 or MKV files. It supports 50X speed, batch downloading, HD quality, and 5.1 surround sound. Once downloaded, you can watch Disney Plus offline anytime, anywhere, without any recording hassles, download expiration, or black screen errors.
Main Features of TunesBank DisneyPlus Video Downloader
- Download Disney+ movies, TV shows and videos in MP4 or MKV format.
- Built-in Web Browser to browse Disney Plus directly within the software.
- Preserves HD video quality and 5.1 surround sound tracks.
- Multiple subtitle formats: soft subtitles, hard subtitles, external subtitles.
- Batch download entire seasons or multiple movies at once.
- 50X ultra-fast speed to export Disney+ videos to save time.
- Keep Disney+ downloads forever without expiration and playback restrictions.
Simple Steps to Download Disney Plus Videos on PC/Mac as MP4 Files
Step 1. Select Disney Plus and Login
Download and launch TunesBank iMovieTool Video Downloader on your Windows PC, laptop, MacBook or iMac. Select Disney Plus as the platform, and a built-in browser will appear. Then nter your Disney Plus credentials to log in.
Step 2. Customize the Output Settings
Move to the Menu at the upper right corner of the interface, and select Preference. Choose your preferred output format (MP4 recommended), set video quality to HD, select your desired audio and subtitle languages, define the output path to save your DisneyPlus downloads.
Step 3. Browse and Add Disney Plus Movies or Shows
Tap “Browse” tab, navigate through the Disney Plus interface within the software, just as you would in a normal browser.
Browse and fine your desired content online. Click on a movie or show to open its detail page.
Then click the “+” icon to add it to the download queue. Before downloading, you can click the “Gear” icon to adjust the video quality, audio track, and subtitle preferences for that specific title.
Tips: You may also search for the video title using name or URL in the “Search” section.
Step 4. Start to Download Disney+ Movies and Shows
When everything is ready, click the “Download” button to start the process.
For TV series, select the specific seasons and episodes you want, then confirm to begin the batch download.
Step 5. Get Downloaded Disney+ Videos
Once the download completes, navigate to the Finished tab. Click the folder icon to open the output folder on your computer, and watch these Disney+ videos offline on your computer!
How to Fix Black Screen Error When Recording Disney Plus with OBS?
If OBS displays a black screen while recording Disney+ video, , check whether the issue comes from OBS itself or from protected playback. Try these fixes:
- Check your OBS capture source.
- Check graphics processor compatibility on your operating system.
- Update OBS Studio to the latest version.
- Check screen recording permissions on Mac.
- Test OBS with non-protected content.
For normal screen recording, these steps often restore the preview. But if the black screen only appears with DRM-protected Disney+ content, it’s likely a content-protection restriction, not an OBS issue. In that case, we recommend using a dedicated Disney+ downloader such as TunesBank DisneyPlus Video Downloader to save your favorite videos instead of recording them.
FAQs About Recording Disney Plus with OBS
Can I Screen Record Disney Plus in OBS on My Mac?
Yes. OBS Studio is available for macOS and supports desktop and app-window recording. You must disable hardware acceleration in your Mac browser (Safari, Chrome, or Firefox) and in OBS. Then use Display Capture (macOS Screen Capture) to record Disney Plus video.
However, Disney+ uses DRM protection, which may prevent OBS from capturing its video. For a high success rate, you can utilize TunesBank DisneyPlus Video Downloader to download Disney Plus videos instead of recording.
Why Is There No Audio When I Record Disney Plus on OBS?
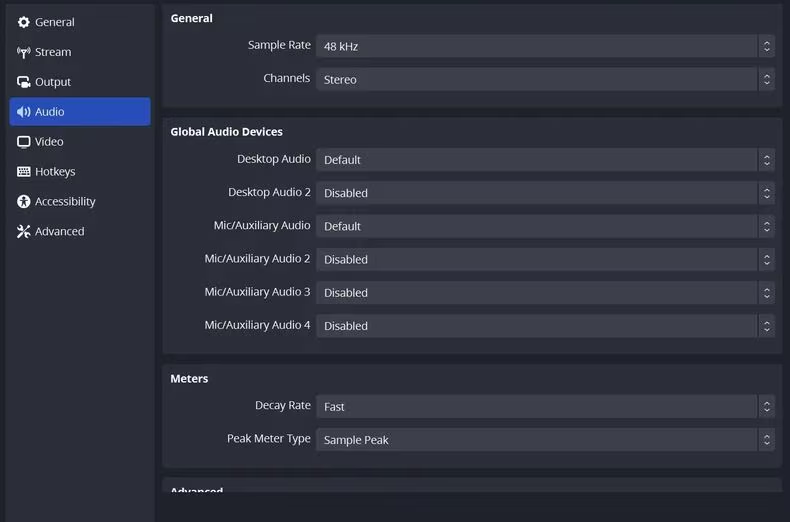
Usually, Disney Plus blocks audio capture through desktop audio sources in OBS. To record Disney Plus in OBS with audio, check that your OBS Desktop Audio device is set correctly, check that your OBS Desktop Audio device is set correctly.
On Mac, download Soundflower first and set use it for sound output. In OBS, go to “Settings”, tap “Audio” tab, change the “Desktop Audio device” from “Default” to “Soundflower”.
Conclusion
OBS Studio is an excellent screen recorder for capturing streaming videos and other desktop activities. To record Disney Plus with OBS without a black screen, first you need to disable the hardware acceleration in your browser. If you find OBS too troublesome to use, you can turn to the professional desktop software – TunesBank DisneyPlus Video Downloader. It can download and save Disney+ movies, TV shows on your Mac or PC without the Disney+ app. With 50X speed, HD quality, multilingual audio tracks & subtitles, and batch downloading, you can build a permanent offline library of your favorite Disney Plus content and enjoy offline viewing freely!
The Latest Articles
– Top 8 Solutions to Download Streaming Video
– Top 10 Free Movie Download Sites Recommended
– 3 Ways to Download Movies to Watch Offline
– 2 Verified Methods to Download X/Twitter Videos to MP4
– Download Twitter(X) Videos on PC, Mac and Mobile Phone
– Download Facebook Videos on PC, Mac and Mobile Phone
– 3 Ways to Download Facebook Video to MP4

Disney+ Video Downloader
Download any Disney+ movies/series/originals to MP4/MKV in high quality on your computer.